

845 字
4 分钟
Nginx笔记(入门)
Nginx笔记
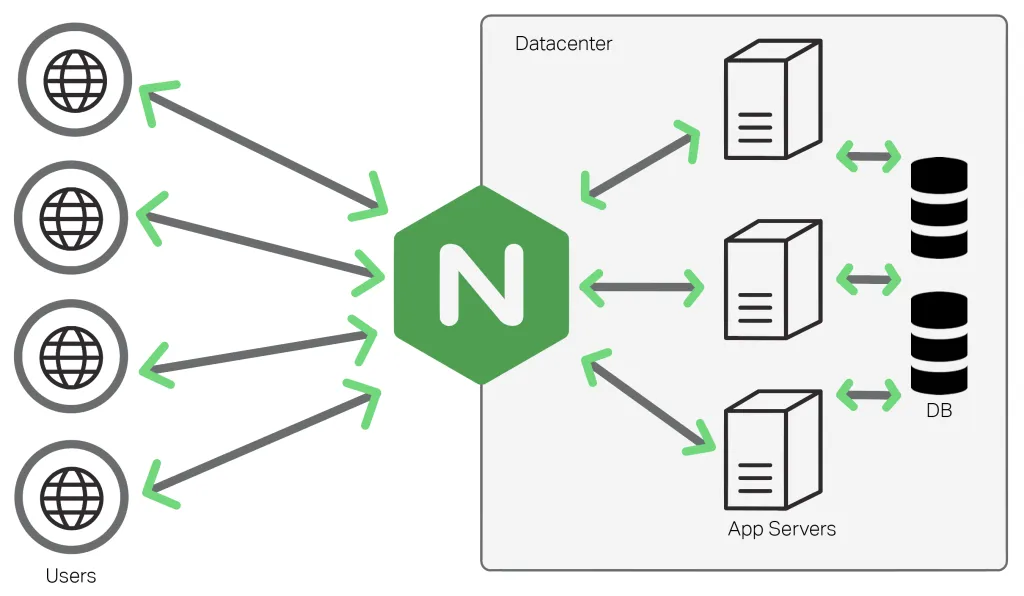
Nginx是目前开发的主流Web服务器,初始的时候是为了支持同时处理高并发而发明的
安装Nginx
拉取镜像
docker pull nginx运行镜像
docker run -d --name nginx -p 80:80 nginx启动/停止容器
docker start/stop nginx进入容器内部交互
docker exec -it nginx bash基本使用
Nginx有一个master进程用于管理多个workder进程,master读取配置文件,workder处理实际请求
显示启动后的相关进程
root@95ea807637ce:/# ps -ef | grep nginx
root         1     0  0 06:44 ?        00:00:00 nginx: master process nginx -g daemon off;
nginx       21     1  0 06:44 ?        00:00:00 nginx: worker process
nginx       22     1  0 06:44 ?        00:00:00 nginx: worker process
root       219    23  0 06:58 pts/0    00:00:00 grep nginx
查看nginx的安装目录,编译参数,配置文件位置等信息
root@95ea807637ce:/# nginx -V
nginx version: nginx/1.29.1
built by gcc 12.2.0 (Debian 12.2.0-14+deb12u1)
built with OpenSSL 3.0.16 11 Feb 2025 (running with OpenSSL 3.0.17 1 Jul 2025)
TLS SNI support enabled
configure arguments: --prefix=/etc/nginx --sbin-path=/usr/sbin/nginx --modules-path=/usr/lib/nginx/modules --conf-path=/etc/nginx/nginx.conf --error-log-path=/var/log/nginx/error.log --http-log-path=/var/log/nginx/access.log --pid-path=/run/nginx.pid --lock-path=/run/nginx.lock --http-client-body-temp-path=/var/cache/nginx/client_temp --http-proxy-temp-path=/var/cache/nginx/proxy_temp --http-fastcgi-temp-path=/var/cache/nginx/fastcgi_temp --http-uwsgi-temp-path=/var/cache/nginx/uwsgi_temp --http-scgi-temp-path=/var/cache/nginx/scgi_temp --user=nginx --group=nginx --with-compat --with-file-aio --with-threads --with-http_addition_module --with-http_auth_request_module --with-http_dav_module --with-http_flv_module --with-http_gunzip_module --with-http_gzip_static_module --with-http_mp4_module --with-http_random_index_module --with-http_realip_module --with-http_secure_link_module --with-http_slice_module --with-http_ssl_module --with-http_stub_status_module --with-http_sub_module --with-http_v2_module --with-http_v3_module --with-mail --with-mail_ssl_module --with-stream --with-stream_realip_module --with-stream_ssl_module --with-stream_ssl_preread_module --with-cc-opt='-g -O2 -ffile-prefix-map=/home/builder/debuild/nginx-1.29.1/debian/debuild-base/nginx-1.29.1=. -fstack-protector-strong -Wformat -Werror=format-security -Wp,-D_FORTIFY_SOURCE=2 -fPIC' --with-ld-opt='-Wl,-z,relro -Wl,-z,now -Wl,--as-needed -pie'
页面位置
root@95ea807637ce:/usr/share/nginx/html# ls
50x.html  index.html
搭建Hexo博客
我们现在尝试部署Hexo博客进入nginx
首先我们安装npm
npm install npm通过npm安装Hexo
npm install hexo-cli -g初始化博客
hexo init blog安装依赖
cd blog
npm install
本地运行博客
hexo server / hexo s生成静态文件
hexo clean   # 清理旧文件
hexo g       # 生成静态文件到 ./public 目录
这样我们就在hexo自带的服务器部署了博客网站,我们将public目录复制到nginx的html目录下重启nginx即可完成部署
[root@iv-ye5w83dog0bw80eugddg public]# cp -rf * /var/lib/docker/volumes/usr/_data/nginx/html配置文件
查看nginx配置文件
workder_processes用于配置workder进程数量,auto会根据内核数量分配,一般设置为和服务器内核数量相等
events块,worker_connections用于配置服务器可以同时接受多少个http的链接请求
http块是修改最为频繁的部分:虚拟主机,反向代理,负载均衡都是在这里配置的
user  nginx;
worker_processes  auto;

error_log  /var/log/nginx/error.log notice;
pid        /run/nginx.pid;

events {
    worker_connections  1024;
}

http {
    include       /etc/nginx/mime.types;
    default_type  application/octet-stream;

    log_format  main  '$remote_addr - $remote_user [$time_local] "$request" '
                      '$status $body_bytes_sent "$http_referer" '
                      '"$http_user_agent" "$http_x_forwarded_for"';

    access_log  /var/log/nginx/access.log  main;

    sendfile        on;
    #tcp_nopush     on;

    keepalive_timeout  65;

    #gzip  on;

    include /etc/nginx/conf.d/*.conf;
}
有的时候还会有额外的配置信息
其余的在http下的server块配置
root@95ea807637ce:/etc/nginx/conf.d# cat default.conf
server {
    listen       80;
    listen  [::]:80;
    server_name  localhost;

    #access_log  /var/log/nginx/host.access.log  main;

    location / {
        root   /usr/share/nginx/html;
        index  index.html index.htm;
    }

    #error_page  404              /404.html;

    # redirect server error pages to the static page /50x.html
    #
    error_page   500 502 503 504  /50x.html;
    location = /50x.html {
        root   /usr/share/nginx/html;
    }

    # proxy the PHP scripts to Apache listening on 127.0.0.1:80
    #
    #location ~ \.php$ {
    #    proxy_pass   http://127.0.0.1;
    #}

    # pass the PHP scripts to FastCGI server listening on 127.0.0.1:9000
    #
    #location ~ \.php$ {
    #    root           html;
    #    fastcgi_pass   127.0.0.1:9000;
    #    fastcgi_index  index.php;
    #    fastcgi_param  SCRIPT_FILENAME  /scripts$fastcgi_script_name;
    #    include        fastcgi_params;
    #}

    # deny access to .htaccess files, if Apache's document root
    # concurs with nginx's one
    #
    #location ~ /\.ht {
    #    deny  all;
    #}
}
在配置完成后可以通过命令nginx -t 查看配置是否正确
root@95ea807637ce:/etc/nginx/conf.d# nginx -t
nginx: the configuration file /etc/nginx/nginx.conf syntax is ok
nginx: configuration file /etc/nginx/nginx.conf test is successful
反向代理
配置后端服务器列表,可以设置权重来设置服务器被访问的频率
upstream backend {
    server thrinisty.top:8080;
    server thrinisty.top:8081;
    server thrinisty.top:8082;
}
当访问/app下的目录的时候就会被代理不同的服务器,默认为轮询
location /app {
	proxy_pass http://backend;
    }