JDBC笔记 JDBC JDBC是JAVA程序操作数据库的一种技术,在绝大多数的框架中JDBC一般都被封装在了各式各样的框架之中,这些框架之后也会学习。但是掌握JDBC是如何连接数据库,操作数据库,返回数据库结果,使用数据库返回结果这也是一个后端开发者应该掌握的基础,掌握了之后对后续框架的理解也是一种帮助
Java对于各大数据库厂商提供了一个连接操作的统一接口,其中定义的方法包括了连接、curd、关闭连接等。而数据库工资负责实现这一些接口,方便Java的开发者利用数据库接口去创建对应数据库实例的创建,再通过动态绑定机制调用数据库实现的相关方法,以下是一个代码示例方便理解(仅仅是模拟,不代表实际开发)
Java数据库接口
1
2
3
4
5
public interface JdbcInterface { public Object getConnection () ; public void crud () ; public void close () ; }
数据库实现接口
1
2
3
4
5
6
7
8
9
10
11
12
13
14
15
16
17
public class MysqlJdbcImpl implements JdbcInterface { @Override public Object getConnection () { System.out.println("连接数据库" ); return null ; } @Override public void crud () { System.out.println("增删改查" ); } @Override public void close () { System.out.println("关闭数据库" ); } }
在实际操作的时候可以创建数据库的对象实例,再调用相关方法
1
2
3
4
5
6
7
8
public class Test { public static void main (String[] args) { JdbcInterface jdbc = new MysqlJdbcImpl (); jdbc.getConnection(); jdbc.crud(); jdbc.close(); } }
这也是接口编程的一个极大优势,无需要更改接口定义,只需要让各自的工具实现公开的接口,就可以完成调用
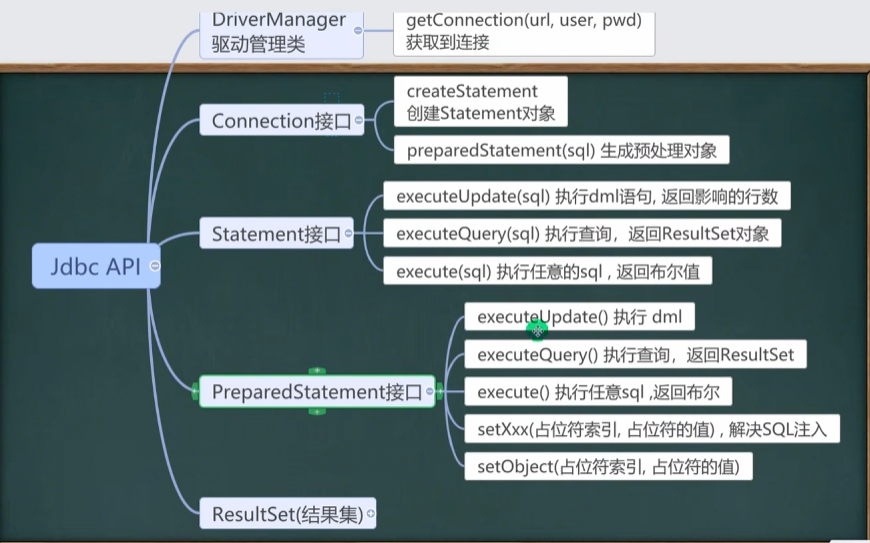
JDBC快速入门 其中我们要用到的有两个包,一个是 java.sql 另一个是 javax.sql
JDBC编写的步骤 1.注册驱动-加载Driver类
2.获取连接-得到Connection
3.执行增删改查-执行sql语句
4.释放资源-关闭释放
程序示例 我们通过jdbc对dept表进行增删改查操作
1
2
3
4
5
CREATE TABLE dept ( `deptno` INT , `dname` VARCHAR ( 30 ), `loc` VARCHAR ( 30 ) );
1
2
3
4
5
6
INSERT INTO deptVALUES ( 10 , 'ACCOUNTING' , 'NEW YORK' ), ( 20 , 'RESEARCH' , 'DALLAS' ), ( 30 , 'SALES' , 'CHICAGO' ), ( 40 , 'OPERATIONS' , 'BOSTON' );
我们首先需要对于项目安装驱动详细内容见教程
https://blog.csdn.net/pan_junbiao/article/details/86626741
将得到的驱动添加到库中
在引入包的时候注意版本
1
2
3
import com.mysql.cj.jdbc.Driver; import com.mysql.jdbc.Driver;
1
2
3
4
5
6
7
8
9
10
11
12
13
14
15
16
17
18
19
20
21
22
23
24
25
26
27
28
29
30
31
public class JDBC01 { public static void main (String[] args) throws SQLException { Driver driver = new Driver (); String agreement = "jdbc:mysql:" ; String address = "localhost" ; String port = "3306" ; String dataBase = "jdbc" ; String url = agreement + "//" + address + ":" + port + "/" + dataBase; Properties properties = new Properties (); properties.setProperty("user" , "root" ); properties.setProperty("password" , "654321" ); Connection connect = driver.connect(url, properties); String sql = "INSERT INTO dept VALUES (10,'ACCOUNTING','NEW YORK');" ; Statement statement = connect.createStatement(); int rows = statement.executeUpdate(sql); System.out.println(rows > 0 ? "success" : "fail" ); statement.close(); connect.close(); } }
查看数据库发现数据库中成功的添加了相关数据
动态加载 其实上述的代码中的静态加载方式可以改进为利用反射动态链接,可以更加灵活
1
2
Class<?> cls = Class.forName("com.mysql.cj.jdbc.Driver" ); Driver driver = (Driver)cls.newInstance();
而且通过动态加载,我们实际上可以不用创建Driver实例加载,因为静态代码块在类加载的时候,底层以及将Driver驱动已经帮我们加载好了
DriverManager 用DriverManager替代Manager,好处是不用Properties以及扩展性好一点
1
2
3
4
String user = "root" ;String password = "654321" ;DriverManager.registerDriver(driver); Connection connect = DriverManager.getConnection(url, user, password);
综上所述,我们的代码可以更改为如下(推荐使用)
1 2 3 4 5 6 7 8 9 10 11 12 13 Class.forName("com.mysql.cj.jdbc.Driver" ); String agreement = "jdbc:mysql:" ;String address = "localhost" ;String port = "3306" ;String dataBase = "jdbc" ;String url = agreement + "//" + address + ":" + port + "/" + dataBase;String user = "root" ;String password = "654321" ;Connection connect = DriverManager.getConnection(url, user, password);
甚至在驱动更高级的版本(5.1.7)中你甚至可以不用Driver加载,但还是建议写上,避免多个驱动混用混乱
最终推荐的方案 我们除了使用动态加载驱动,用DriverManager管理连接,我们还可以将我们的连接数据库写的更加灵活一点,写一个配置文件,让程序从配置文件中读取连接对象,用户密码等
配置文件
1
2
3
4
5
6
7
agreement =jdbc:mysql: address =localhost port =3306 dataBase =jdbc user =root password =654321 driver =com.mysql.cj.jdbc.Driver
Java代码
1
2
3
4
5
6
7
8
9
10
11
12
13
14
15
16
17
18
19
20
21
22
23
24
25
26
27
28
29
30
31
32
public class Test { @SuppressWarnings ({"all" }) public static void main (String[] args) throws Exception{ Properties properties = new Properties (); properties.load(new FileInputStream ("src\\mysql.properties" )); String user = properties.getProperty("user" ); String password = properties.getProperty("password" ); String driver = properties.getProperty("driver" ); String agreement = properties.getProperty("agreement" ); String address = properties.getProperty("address" ); String port = properties.getProperty("port" ); String dataBase = properties.getProperty("dataBase" ); Class.forName(driver); String url = agreement + "//" + address + ":" + port + "/" + dataBase; Connection connection = DriverManager.getConnection(url, user, password); Statement statement = connection.createStatement(); String sql = "select deptno,dname,loc from dept" ; ResultSet resultSet = statement.executeQuery(sql); while (resultSet.next()) { int deptno = resultSet.getInt(1 ); String dname = resultSet.getString(2 ); String loc = resultSet.getString(3 ); System.out.println(deptno + " " + dname + " " + loc); } resultSet.close(); statement.close(); connection.close(); } }
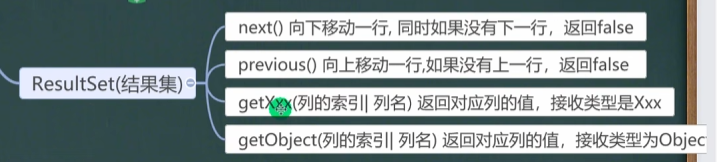
结果集 我们在使用JDBC执行查询语句的时候需要用结果集ResultSet来存储返回的结果
ResultSet表示数据库结果集数据表,通常由执行查询数据库的语句生成,ResultSet对象保持一个光标指向其当前行的数据行
最初,光标只想第一行之前,next方法将光标指向下一行,并且在没有行的时候返回false,可以使用while循环来遍历结果集
1 2 3 4 5 6 7 8 9 10 11 12 13 Statement statement = connect.createStatement();String sql = "select ename,job,deptno from emp" ;ResultSet result = statement.executeQuery(sql);while (result.next()) { String ename = result.getString(1 ); String job = result.getString(2 ); int deptno = result.getInt(3 ); System.out.println(ename + "\t" + job + "\t" + deptno); }
输出结果
1
2
3
4
5
6
SMITH CLERK 20 ALLEN SALESMAN 30 WARD SALESMAN 30 JOOES MANAGER 20 MARTIN SALESMAN 30 BLAKE MANAGER 30
其实结果集的底层是一个ArrayList,包含了一个对象数组包含了各行的数据
执行对象 基本介绍 1.Statement对象用于执行静态SQL语句并返回其生成的结果对象
2.在建立连接后,需要对数据库进行访问,执行命令或者是SQL语句可以通过Statement PreparedStatement CallableStatement(依次继承前者)来完成
3.Statement对象执行SQL语句,存在SQL注入风险
4.SQL注入是利用某些系统没有对用户输入的数据进行充分的检查,在用户输入数据中注入非法的SQL语句段或者命令,以此恶意攻击数据库
5.要防范SQL注入只要用PreparedStatement取代Statement即可
SQL注入 在历史中曾有运用SQL注入来攻破数据库的案例,例如如下是一个用户登陆的案例,我们需要使用用户名称以及用户密码来查找出用户用以登录
1 select * from admin where name = 'user' and pwd = 'password' ;
其中target用我们用户输入的内容替换,正常的情况中输入正确的用户以及密码即可找到对应的用户,但是通过SQL注入我们输入的用户密码如下
1
2
user = 1 ' or password = or '1 ' = '1
将用户以及密码替换到数据库语句中就会发生以下情况
1 select * from admin where name = '1' or ' and pwd = ' or '1' = '1' ;
其中’1’ = ‘1’显然是满足条件的,以此我们得到了所有用户的记录,以下是一个代码示例
1 2 3 4 5 6 7 8 9 10 11 12 13 14 15 16 System.out.print("输入用户名称:" ); String inputName = scanner.nextLine();System.out.print("输入用户密码:" ); String inputPwd = scanner.nextLine();String sql = "select id,name,pwd from admin where name = '" + inputName + "' and pwd = '" + inputPwd + "';" ;System.out.println(sql); ResultSet result = statement.executeQuery(sql);while (result.next()) { int id = result.getInt(1 ); String name = result.getString(2 ); String pwd = result.getString(3 ); System.out.println(id + "\t" + name + "\t" + pwd); }
测试结果
1
2
3
4
5
6
输入用户名称:1' or 输入用户密码:or '1' = '1 select id,name,pwd from admin where name = '1' or' and pwd = 'or '1' = '1'; 2 user1 password1 3 user2 password2 4 user3 password3
或者你想要查看一个指定的用户(密码随意)
1
2
3
4
输入用户名称:user2' -- 输入用户密码:123 select id,name,pwd from admin where name = 'user2' -- ' and pwd = '123'; 3 user2 password2
这是非常危险的,这个时候我们就需要使用到新的PreparedStatement对象来防止SQL注入的发生
PreparedStatement 1.PreparedStatement执行的SQL语句中的参数用?来表示,调用PreparedStatement对象的setXxx()方法来设置这些参数,setXxx()方法有两个参数,第一个参数是要设置的SQL语句中的参数的索引,从1开始,第二个是设置SQL语句中的参数值
2.调用executeQuery() 返回ResultSet对象
3.调用executeUpdate() 来执行增删改操作
通过这样的对象我们不用+进行sql的拼接,减少语法错误的概率,还可以解决sql注入的问题,大大减少了编译的次数,效率较高
具体使用
1
2
3
4
5
6
7
8
9
10
11
12
13
14
15
16
17
18
19
20
21
22
23
24
25
26
27
28
29
30
31
32
33
34
35
public class Prepared { public static void main (String[] args) throws Exception{ Properties properties = new Properties (); properties.load(new FileInputStream ("src\\mysql.properties" )); String user = properties.getProperty("user" ); String password = properties.getProperty("password" ); String driver = properties.getProperty("driver" ); String agreement = properties.getProperty("agreement" ); String address = properties.getProperty("address" ); String port = properties.getProperty("port" ); String dataBase = properties.getProperty("dataBase" ); Class.forName(driver); String url = agreement + "//" + address + ":" + port + "/" + dataBase; Connection connection = DriverManager.getConnection(url, user, password); String sql = "select deptno,dname,loc from dept where deptno = ?" ; PreparedStatement statement = connection.prepareStatement(sql); statement.setInt(1 , 10 ); ResultSet resultSet = statement.executeQuery(); while (resultSet.next()) { int deptno = resultSet.getInt(1 ); String dname = resultSet.getString(2 ); String loc = resultSet.getString(3 ); System.out.println(deptno + " " + dname + " " + loc); } resultSet.close(); statement.close(); connection.close(); } }
三者对比
特性
Statement
PreparedStatement
CallableStatement
SQL预编译
✔️
✔️
✔️
防SQL注入
❌
✔️
✔️
参数化查询
❌
✔️
✔️
调用存储过程
❌
❌
✔️
性能
低
高
高
使用频率
低
高
中
JDBC封装 在jdbc操作中其实获取链接和释放操作都是我们会经常用到的,每一次都重写一遍其实非常的浪费时间,我们这个时候就有必要封装一个JDBC的工具模块来供自己调用
封装示例 以下是一个封装示例
1
2
3
4
5
6
7
8
9
10
11
12
13
14
15
16
17
18
19
20
21
22
23
24
25
26
27
28
29
30
31
32
33
34
35
36
37
38
39
40
41
42
43
44
45
46
47
48
49
50
51
52
53
54
55
public class JDBCUtils { private static final String user; private static final String password; private static final String driver; private static final String agreement; private static final String address; private static final String port; private static final String dataBase; static { Properties properties = new Properties (); try { properties.load(new FileInputStream ("src\\mysql.properties" )); user = properties.getProperty("user" ); password = properties.getProperty("password" ); driver = properties.getProperty("driver" ); agreement = properties.getProperty("agreement" ); address = properties.getProperty("address" ); port = properties.getProperty("port" ); dataBase = properties.getProperty("dataBase" ); Class.forName(driver); } catch (Exception e) { throw new RuntimeException (e); } } public static Connection getConnection () { String url = agreement + "//" + address + ":" + port + "/" + dataBase; try { return DriverManager.getConnection(url, user, password); } catch (SQLException e) { throw new RuntimeException (e); } } public static void close (ResultSet result, Statement statement, Connection connection) { try { if (result != null ) { result.close(); } if (statement != null ) { statement.close(); } if (connection != null ) { connection.close(); } } catch (SQLException e) { throw new RuntimeException (e); } } }
测试代码 接下来我们用测试代码进行调用测试
1
2
3
4
5
6
7
8
9
10
11
12
13
14
15
16
17
18
19
20
21
22
23
24
public class Prepared { public static void main (String[] args) { Connection connection = JDBCUtils.getConnection(); String sql = "select deptno,dname,loc from dept where deptno = ?" ; PreparedStatement statement = null ; ResultSet resultSet = null ; try { statement = connection.prepareStatement(sql); statement.setInt(1 , 10 ); resultSet = statement.executeQuery(); while (resultSet.next()) { int deptno = resultSet.getInt(1 ); String dname = resultSet.getString(2 ); String loc = resultSet.getString(3 ); System.out.println(deptno + " " + dname + " " + loc); } } catch (SQLException e) { throw new RuntimeException (e); } finally { JDBCUtils.close(resultSet, statement, connection); } } }
这样相较于前文中的全部代码不光简单了很多,而且异常处理也非常的合理
JDBC事务 基本介绍 1.JDBC程序中当一个Connection对象创建时,默认情况下是自动提交事务,每次执行一个SQL语句时如果执行成功,就会像数据库中自动提交事务,不可以回滚
2.JDBC程序中为了让多个SQL语句作为一个整体执行,需要使用事务,这里是事务acid中的原子性
3.调用Connection的setAutoCommit(false) 可以取消自动提交事务
4.在所有的SQL语句都执行成功后,调用commit方法进行提交事务
5.在其中某个操作失败或者出现异常的时候,调用rollback方法进行回滚事务
代码示例 以下代码完成了账户中转账的操作,但是假设在第二条SQL语句执行失败的情况下,异常被捕获第二条语句的转账没有收到,就会少了100块钱
1
2
3
4
5
6
7
8
9
10
11
12
13
14
15
16
17
18
19
20
21
22
23
24
25
public class Prepared { public static void main (String[] args) { Connection connection = JDBCUtils.getConnection(); String sql1 = "update balance set money = money - 100 where id = 1" ; String sql2 = "update balance set money = money + 100 where id = 2" ; PreparedStatement statement = null ; ResultSet resultSet = null ; try { statement = connection.prepareStatement(sql1); int row = statement.executeUpdate(); System.out.println(row > 0 ? "success" : "fail" ); statement = connection.prepareStatement(sql2); row = statement.executeUpdate(); System.out.println(row > 0 ? "success" : "fail" ); } catch (SQLException e) { throw new RuntimeException (e); } finally { JDBCUtils.close(resultSet, statement, connection); } } }
这个时候我们就需要运用到事务来解决
1
2
3
4
5
6
7
8
9
10
11
12
13
14
15
16
17
18
19
20
21
22
23
24
25
26
27
28
29
30
31
32
33
34
35
36
37
38
public class Prepared { public static void main (String[] args) { Connection connection = JDBCUtils.getConnection(); String sql1 = "update balance set money = money - 100 where id = 1" ; String sql2 = "update balance set money = money + 100 where id = 3" ; PreparedStatement statement = null ; ResultSet resultSet = null ; try { connection.setAutoCommit(false ); statement = connection.prepareStatement(sql1); int row = statement.executeUpdate(); if (row <= 0 ) { throw new SQLException (); } statement = connection.prepareStatement(sql2); row = statement.executeUpdate(); if (row <= 0 ) { throw new SQLException (); } connection.commit(); } catch (SQLException e) { try { connection.rollback(); } catch (SQLException ex) { throw new RuntimeException (ex); } throw new RuntimeException (e); } finally { JDBCUtils.close(resultSet, statement, connection); } } }
这样的话,即使我们的第二条语句执行了一个不存在的用户3,用户1账户的钱也不会消失,注意当row=0时主动抛出异常,以便catch处理回滚