Java笔记 集合 集合框架体系 (要求记忆)
单列集合
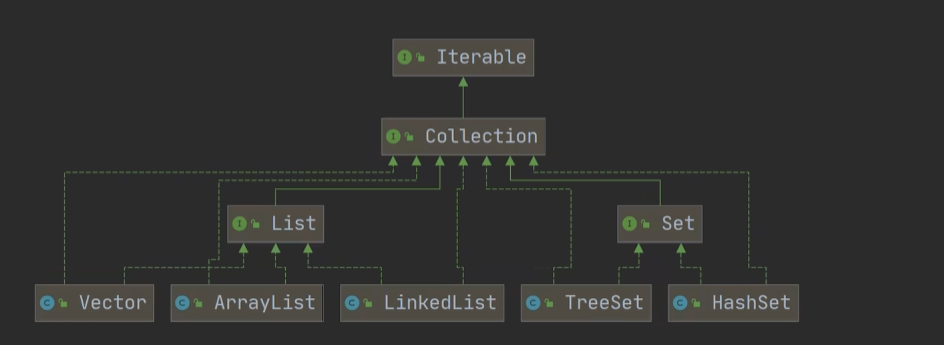
Collection下有两大重要的接口一个List另一个为Set
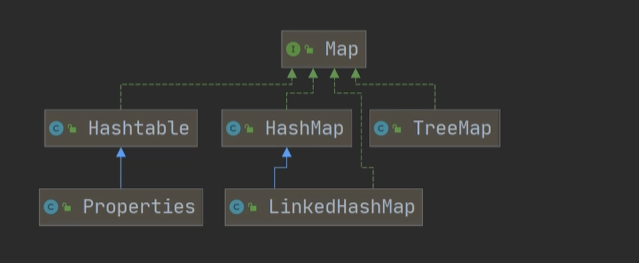
双列集合
存放的是K-V
Map接口下有三个重要的类Hashtable ,HashMap , TreeMap
两个集合不同区别,存放数据的个数
1
2
3
4
5
6
7
8
9
10
11
12
13
14
15
public class Collection_ { @SuppressWarnings({"all"}) public static void main (String[] args) { ArrayList arrayList = new ArrayList (); arrayList.add("A" ); arrayList.add("B" ); arrayList.add("C" ); HashMap hashMap = new HashMap (); hashMap.put("1" , "北京" ); hashMap.put("2" , "北京" ); hashMap.put("3" , "北京" ); } }
产生原因 为什么要学习集合,是因为数组的灵活性不够
数组的不足:
1.数组长度没有办法扩容
2.保存的数据使用一类型(虽然可以使用多态)
3.使用数组进行增加和删除的时候比较麻烦(要创建新的数组依次拷贝)
而集合上而言
1.它可以动态保存任意多个对象,使用方便
2.提供了一系列方便的操作对象的方法实现增删改查
3.使用了集合添加元素简单明了
Collection接口 单列集合
Collection下有两大重要的接口一个List另一个为Set
接口特点 1.Collection实现子类可以存放多个元素,每个元素可以是Object(多态)
2.有的Collection接口的实现类可以放重复元素(List,Queue),而有的不可以放重复元素(Set)
3.Collection的实现类中,有的保持插入顺序(List),有的不保证顺序(如 HashSet),还有的会自动排序(如 TreeSet PriorityQueue)
4.Collection接口没有直接实现的子类,而是通过子接口Set和List来实现
Collection中常用的方法 以ArrayList演示
add添加元素 1 2 3 4 5 6 7 8 9 10 public class Collection_ { @SuppressWarnings({"all"}) public static void main (String[] args) { List list = new ArrayList (); list.add("A" ); list.add(10 ); list.add(true ); System.out.println(list); } }
remove删除元素 传入元素
List中删除数字类型的元素得创建包装类去删除,否则会删除对应下标的元素
1 2 3 4 5 6 7 8 9 10 11 12 13 public class Collection_ { @SuppressWarnings({"all"}) public static void main (String[] args) { List list = new ArrayList (); list.add("A" ); list.add(10 ); list.add(true ); list.remove(2 ); list.remove(new Integer (10 )); System.out.println(list); } }
contains存在性 1 2 3 4 5 6 7 8 9 10 11 12 public class Collection_ { @SuppressWarnings({"all"}) public static void main (String[] args) { List list = new ArrayList (); list.add("A" ); list.add(10 ); list.add(true ); System.out.println(list.contains(15 )); } }
size获取元素个数 1 2 3 4 5 6 7 8 9 10 public class Collection_ { @SuppressWarnings({"all"}) public static void main (String[] args) { List list = new ArrayList (); list.add("A" ); list.add(10 ); list.add(true ); System.out.println(list.size()); } }
isEmpty判断是否为空 1 2 3 4 5 6 7 8 9 10 public class Collection_ { @SuppressWarnings({"all"}) public static void main (String[] args) { List list = new ArrayList (); list.add("A" ); list.add(10 ); list.add(true ); System.out.println(list.isEmpty()); } }
clear清空集合 1 2 3 4 5 6 7 8 9 10 11 12 public class Collection_ { @SuppressWarnings({"all"}) public static void main (String[] args) { List list = new ArrayList (); list.add("A" ); list.add(10 ); list.add(true ); list.clear(); list.add("B" ); System.out.println(list); } }
addAll添加多个元素 可以传入集合
1 2 3 4 5 6 7 8 9 10 11 12 13 14 15 16 public class Collection_ { @SuppressWarnings({"all"}) public static void main (String[] args) { List list = new ArrayList (); list.add("A" ); list.add(10 ); list.add(true ); List list2 = new ArrayList (); list2.add("B" ); list2.add("C" ); list.addAll(list2); System.out.println(list); } }
removeAll删除多个元素 1 2 3 4 5 6 7 8 9 10 11 12 13 14 15 16 public class Collection_ { @SuppressWarnings({"all"}) public static void main (String[] args) { List list = new ArrayList (); list.add("A" ); list.add(10 ); list.add(true ); List list2 = new ArrayList (); list2.add("A" ); list2.add(10 ); list.removeAll(list2); System.out.println(list); } }
Collection遍历方式 迭代器 Iterator对象,可以用它进行元素遍历,而Collection接口实现了Iterator,所以只要是实现了Collection接口的子类都可以获取一个迭代器Iterator() 遍历元素
1 2 3 public interface Iterator <E> { boolean hasNext () ; E next () ;
next用于返回元素然后下移,而hasNext方法要求实现有下一个元素返回true,在子类的实现中应该在next前加上hasNext的判断条件
1 2 3 4 5 6 7 8 9 10 11 12 13 14 15 public class Collection_ { @SuppressWarnings({"all"}) public static void main (String[] args) { List list = new ArrayList (); list.add("A" ); list.add(10 ); list.add(true ); Iterator it = list.iterator(); while (it.hasNext()) { Object next = it.next(); System.out.print(next + " " ); } } }
在IDEA中可以使用 itit 模板补全迭代器while循环
当我们需要再次遍历的时候我们需要重置迭代器(将指针指向开头)
1 Iterator it = list.iterator();
增强for循环 底层是迭代器
1 2 3 4 5 6 7 8 9 10 11 12 public class Collection_ { @SuppressWarnings({"all"}) public static void main (String[] args) { List list = new ArrayList (); list.add("A" ); list.add(10 ); list.add(true ); for (Object o : list) { System.out.print(o + " " ); } } }
调试步骤
用IDEA就可以使用快捷补全 大写的 I
1.先获取迭代器
1 2 3 public Iterator<E> iterator () { return new Itr (); }
2.判断有下一个元素
1 2 3 public boolean hasNext () { return cursor != size; }
3.获取并指向下一个
1 2 3 4 5 6 7 8 9 10 11 public E next () { checkForComodification(); int i = cursor; if (i >= size) throw new NoSuchElementException (); Object[] elementData = ArrayList.this .elementData; if (i >= elementData.length) throw new ConcurrentModificationException (); cursor = i + 1 ; return (E) elementData[lastRet = i]; }
也可以在数组上使用
1 2 3 4 5 6 7 8 9 public class Collection_ { @SuppressWarnings({"all"}) public static void main (String[] args) { int [] array = {1 , 2 , 3 , 4 , 5 , 6 , 7 , 8 , 9 , 10 }; for (int o : array) { System.out.print(o + " " ); } } }
List接口 List接口特点 Set接口的子类(HashSet,TreeSet)无法使用这些方法
而List接口子类Vector, ArrayList , LinkedList可以使用List接口方法
List集合中的元素有序(添加和取出顺序一致),元素可以重复,支持索引获取
常用方法 get获取元素 1 2 3 4 5 6 7 8 9 10 11 12 13 14 public class List01 { @SuppressWarnings({"all"}) public static void main (String[] args) { List list = new ArrayList (); list.add("jack" ); list.add("tom" ); list.add("marry" ); list.add("lory" ); list.add("jack" ); System.out.println(list); System.out.println(list.get(3 )); } }
add插入元素 默认插入到元素末尾,可以添加索引指定插入
1 2 3 4 5 6 7 8 9 10 11 12 13 14 15 16 public class List01 { @SuppressWarnings({"all"}) public static void main (String[] args) { List list = new ArrayList (); list.add("jack" ); list.add("tom" ); list.add("marry" ); list.add("lory" ); list.add("jack" ); System.out.println(list); list.add(2 , "funny" ); System.out.println(list); } }
addAll插入集合 默认插入集合尾部
传入索引 加 集合,可以在指定位置插入多个元素
1 2 3 4 5 6 7 8 9 10 11 12 13 14 15 16 17 18 public class List01 { @SuppressWarnings({"all"}) public static void main (String[] args) { List list = new ArrayList (); list.add("jack" ); list.add("tom" ); list.add("marry" ); list.add("lory" ); List list1 = new ArrayList (); list1.add("杰克" ); list1.add("杰瑞" ); list.addAll(1 , list1); System.out.println(list); [jack, 杰克, 杰瑞, tom, marry, lory] } }
index Of与 lastIndexOf 和数组类似
1 2 3 4 5 6 7 8 9 10 11 12 public class List01 { @SuppressWarnings({"all"}) public static void main (String[] args) { List list = new ArrayList (); list.add("jack" ); list.add("tom" ); list.add("marry" ); list.add("lory" ); System.out.println(list.indexOf("jack" )); } }
set 替换元素 1 2 3 4 5 6 7 8 9 10 11 12 13 public class List01 { @SuppressWarnings({"all"}) public static void main (String[] args) { List list = new ArrayList (); list.add("jack" ); list.add("tom" ); list.add("marry" ); list.add("lory" ); list.set(0 , "tom" ); System.out.println(list); } }
subList 返回子集合 左闭右包
1 2 3 4 5 6 7 8 9 10 11 12 13 public class List01 { @SuppressWarnings({"all"}) public static void main (String[] args) { List list = new ArrayList (); list.add("jack" ); list.add("tom" ); list.add("marry" ); list.add("lory" ); list.set(0 , "tom" ); System.out.println(list.subList(1 , 3 )); } }
除了迭代器遍历,增强for循环,ArrayList由于底层是数组实现,我们还可以通过普通的for循环遍历
1 2 3 4 5 6 7 8 9 10 11 12 13 14 15 public class List01 { @SuppressWarnings({"all"}) public static void main (String[] args) { List list = new ArrayList (); list.add("jack" ); list.add("tom" ); list.add("marry" ); list.add("lory" ); list.set(0 , "tom" ); for (int i = 0 ; i < list.size(); i++) { Object o = list.get(i); System.out.println(o); } } }
例题(按年龄集合排序)
我自己做的时候是将集合转为数组,用数组自定义排序,再放回集合,但是有些复杂了
1 2 3 4 5 6 7 8 9 10 11 12 13 14 15 16 17 18 19 20 21 22 23 24 25 26 27 28 29 30 31 32 33 34 35 36 37 38 39 40 41 42 43 44 45 46 47 48 49 50 import java.util.*;public class Collection_ { @SuppressWarnings({"all"}) public static void main (String[] args) { ArrayList list = new ArrayList (); list.add(new Dog ("旺财" , 19 )); list.add(new Dog ("来福" , 12 )); list.add(new Dog ("小黑" , 13 )); list = sortList(list); System.out.println(list); } public static List sortList (List list) { Dog[] array = new Dog [list.size()]; for (int i = 0 ; i < list.size(); i++) { Dog d = (Dog)list.get(i); array[i] = d; } Arrays.sort(array, new Comparator () { public int compare (Object o1, Object o2) { Dog d1 = (Dog)o1; Dog d2 = (Dog)o2; return d1.age - d2.age; } }); list.clear(); for (int i = 0 ; i < array.length; i++) { list.add(array[i]); } return list; } } class Dog { String name; int age; Dog(String name, int age) { this .name = name; this .age = age; } @Override public String toString () { return " Dog " + name + " are " + age; } }
也可以使用标准的冒泡排序
1 2 3 4 5 6 7 8 9 10 11 12 public static void sortList (List list) { int size = list.size(); for (int i = 0 ; i < size - 1 ; i++) { for (int j = 0 ; j < size - i - 1 ; j++) { Dog dog1 = (Dog) list.get(j); Dog dog2 = (Dog) list.get(j + 1 ); if (dog1.age > dog2.age) { list.set(j, dog2); list.set(j + 1 , dog1); } } } }
因为都是List的子类,所以方法可以传入Vector ArrayList LinkedList
List子类 ArrayList使用注意事项 1.ArrayList中可以放入null,而且是多个
2.ArrayList是由数组来实现数据存储的
1 2 transient Object[] elementData;private int size
3.ArrayList基本上等同于Vector,除了ArrayList是线程不安全的(但是执行效率高)
它的方法没有synchronized关键字
1 2 3 4 5 public boolean add (E e) { ensureCapacityInternal(size + 1 ); elementData[size++] = e; return true ; }
而Vector是有的
1 2 3 4 5 6 public synchronized boolean add (E e) { modCount++; ensureCapacityHelper(elementCount + 1 ); elementData[elementCount++] = e; return true ; }
ArrayList的底层机制 扩容流程 1.ArrayList中维护了一个Object类型的数组elementData
其中transient(短暂的),表示该属性不会被序列化
1 2 transient Object[] elementData;private int size
2.当创建ArrayList对象的时候,如果使用的是无参构造器,则出事的elementData容量为0,当第一次添加的时候,扩容10,再次扩容扩容原来的1.5倍
1 2 3 4 public ArrayList () { this .elementData = DEFAULTCAPACITY_EMPTY_ELEMENTDATA; }
3.如果是使用指定大小的构造器,则初始elementData容量为指定大小,扩容扩容原来的1.5倍
1 2 3 4 5 6 7 8 9 10 public ArrayList (int initialCapacity) { if (initialCapacity > 0 ) { this .elementData = new Object [initialCapacity]; } else if (initialCapacity == 0 ) { this .elementData = EMPTY_ELEMENTDATA; } else { throw new IllegalArgumentException ("Illegal Capacity: " + initialCapacity); } }
底层扩容机制 建议自己去Debug追一下
当添加的时候会调用ensureCapacityInternal
1 2 3 4 5 public boolean add (E e) { ensureCapacityInternal(size + 1 ); elementData[size++] = e; return true ; }
1 2 3 4 5 6 7 private void ensureExplicitCapacity (int minCapacity) { modCount++; if (minCapacity - elementData.length > 0 ) grow(minCapacity); }
底层判断容量不够时扩容的方法
1 2 3 4 5 6 7 8 9 10 11 12 private void grow (int minCapacity) { int oldCapacity = elementData.length; int newCapacity = oldCapacity + (oldCapacity >> 1 ); if (newCapacity - minCapacity < 0 ) newCapacity = minCapacity; if (newCapacity - MAX_ARRAY_SIZE > 0 ) newCapacity = hugeCapacity(minCapacity); elementData = Arrays.copyOf(elementData, newCapacity); }
Vector使用注意事项 1.定义继承于AbstractList抽象类,实现了 List, RandomAccess, Cloneable接口
1 2 3 4 public class Vector <E> extends AbstractList <E> implements List <E>, RandomAccess, Cloneable, java.io.Serializable {
2.底层也是维护了一个对象数组
1 2 protected Object[] elementData;protected int elementCount;
3.Vector是线程同步的,操作的方法带有synchronized,所以在多线程并发的时候需要使用Vector而不是ArrayList,除非只有一个线程来操作该数据,可以使用ArrayList提高效率(不需要进行线程安全的检查)
Vector的扩容机制 这里不再过多的重复,大体跟ArrayList类似,只是后续扩容更改为两倍扩容
LinkedList使用注意事项 1.LinkedList底层实现了双向链表和双端队列特点
2.可以添加任意元素(元素可以重复)包括null
3.线程不安全,没有实现同步
双端队列补充知识 双端队列(Deque, Double Ended Queue)允许在队列的两端进行插入和删除操作,这为LinkedList带来了以下优势
两端操作能力 头部操作 :可以在列表开头高效地添加/删除元素
1 2 list.addFirst(e); list.removeFirst();
尾部操作 :可以在列表末尾高效地添加/删除元素
1 2 list.addLast(e); list.removeLast();
实现多种数据结构 利用双端队列特性,LinkedList可以轻松模拟:
栈(Stack):后进先出(LIFO)
1 2 3 Deque<String> stack = new LinkedList <>(); stack.push("A" ); stack.pop();
队列(Queue):先进先出(FIFO)
1 2 3 Queue<String> queue = new LinkedList <>(); queue.offer("A" ); queue.poll();
学过数据结构的可以直接跳过这一个部分
可以直接去构造这么一个链表节点,实现一些方法去输出链表,添加节点,删除节点等
1 2 3 4 5 6 7 8 9 10 11 12 13 14 15 16 17 18 19 20 21 22 class Node { public Node next; public Node prev; public Object item; public Node (Object item) { this .item = item; } public void addNode (Node newNode) { this .next = newNode; newNode.prev = this ; } public void printNode () { Node Point = this ; while (Point != null ) { System.out.println(Point.item); Point = Point.next; } } }
底层源码中我们在添加的时候会创建新的链表结点,然后运用前后引用连接
1 2 3 4 public boolean add (E e) { linkLast(e); return true ; }
1 2 3 4 5 6 7 8 9 10 11 void linkLast (E e) { final Node<E> l = last; final Node<E> newNode = new Node <>(l, e, null ); last = newNode; if (l == null ) first = newNode; else l.next = newNode; size++; modCount++; }
LinkedList和ArrayList的比较 1.在维护的数据结构上而言,前者是双向链表,而后者是数组
2.在增删的效率上而言LinkedList高于ArrayList
3.在改查的效率上而言LinkedList低于于ArrayList
结论:在一般的情况下程序中80%-90%的操作都是查询,大多数选的是ArrayList,也可以根据需要使用LinkedList
Set接口 set接口特点 1.无序(添加和取出的顺序不一致),没有索引,无法通过索引来操作
2.不允许重复元素,最多包含有一个null
3.Set接口类常用的有两个TreeSet,HashSet
1
2
3
4
5
6
7
8
9
10
11
12
public class SetMethod { @SuppressWarnings({"all"}) public static void main (String[] args) { Set set = new HashSet (); set.add("hello" ); set.add("world" ); set.add("hello" ); set.add("world" ); set.add(null ); System.out.println(set); } }
这里看到虽然加入了两个hello world,但是只存放了一个,而且输出的顺序和放入的不一致(但是输出的顺序是同一个不会因为再次输出而改变)
可以通过两种方式遍历(迭代器和增强for循环)
但是不可以使用for循环,因为没有办法使用get用索引找到对应元素
1 2 3 4 5 6 7 8 9 10 11 12 13 14 15 16 17 18 19 20 public class SetMethod { @SuppressWarnings({"all"}) public static void main (String[] args) { Set set = new HashSet (); set.add("hello" ); set.add("world" ); set.add("hello" ); set.add("world" ); set.add(null ); Iterator iterator = set.iterator(); while (iterator.hasNext()) { Object obj = iterator.next(); System.out.println(obj); } for (Object obj : set) { System.out.println(obj); } } }
Set子类 HashSet说明 1.HashSet实现了Set接口
2.HashSet实际上是HashMap
3.可以存放null,但只能有一个null
4.HashSet不保证元素有序,取决于hash后确定的索引结果
5.不能有重复的对象
在add添加元素的时候会返回一个boolean值,当添加成功的时候会返回一个true
,当添加失败的时候返回一个false
1 2 3 4 5 6 7 8 9 10 11 12 13 14 15 16 17 18 public class SetMethod { @SuppressWarnings({"all"}) public static void main (String[] args) { Set set = new HashSet (); set.add("hello" ); set.add("world" ); System.out.println(set.add("hello" )); set.add(new Student ()); System.out.println(set.add(new Student ())); set.add(null ); System.out.println(set); } } class Student {}
输出结果
1 2 3 false true [null, world, com.Student@74 a14482, com.Student@4554617 c, hello]
HashSet的底层机制 HashSet的底层是HashMap而,HashMap的底层是(数组+链表+红黑树)
模拟简单的HashSet 在讲解底层机制之前我们先去模拟一下简单的数组+链表结构(忽略到达一定程度分为红黑树)
1 2 3 4 5 6 7 8 9 10 11 12 13 14 15 16 17 18 19 20 21 22 23 24 25 26 public class HashSetStructure { public static void main (String[] args) { Node[] table = new Node [16 ]; Node john = new Node ("John" , null ); table[2 ] = john; Node jane = new Node ("Jane" , null ); john.next = jane; Node rose = new Node ("Rose" , null ); jane.next = rose; Node Lucy = new Node ("Lucy" , null ); table[5 ] = Lucy; } } class Node { Object item; Node next; public Node (Object item, Node next) { this .item = item; this .next = next; } }
HashSet底层添加元素 1.当添加一个元素的时候会先得到hash值,而又会将hash值转为索引值
2.找到存储的table表,通过这个索引位置看是否有元素以及被放入
3.如果没有就将该元素放入table表中
4.有的话先调用equals进行比较,如果相同就放弃添加,并返回false,不相同就将该元素放入链表最后
5.在Java8中,一条链表中的元素个数大于等于上限(8),并且table的大小大于等于阈值(64)就会将链表树化(红黑树)
HashSet创建添加元素(Debug调试)
首先先创建一个HashMap结构
1 2 3 public HashSet () { map = new HashMap <>(); }
在添加元素的时候调用add添加
1 2 3 public boolean add (E e) { return map.put(e, PRESENT)==null ; }
传入的是key值以及value,而hash方法会根据key调用HashCode创建一个值
1 2 3 public V put (K key, V value) { return putVal(hash(key), key, value, false , true ); }
1 2 3 4 5 6 7 8 9 static final int hash (Object key) { int h; return (key == null ) ? 0 : (h = key.hashCode()) ^ (h >>> 16 ); }
返回HashCode的一个编码后,会进入正真扩容存放节点的方法,我用AI添加了一些注释用于辅助理解
1 2 3 4 5 6 7 8 9 10 11 12 13 14 15 16 17 18 19 20 21 22 23 24 25 26 27 28 29 30 31 32 33 34 35 36 37 38 39 40 41 42 43 44 45 46 47 48 49 50 51 52 53 54 55 56 57 58 59 60 61 62 63 64 65 66 67 68 69 70 71 72 final V putVal (int hash, K key, V value, boolean onlyIfAbsent, boolean evict) { Node<K,V>[] tab; Node<K,V> p; int n, i; if ((tab = table) == null || (n = tab.length) == 0 ) n = (tab = resize()).length; if ((p = tab[i = (n - 1 ) & hash]) == null ) tab[i] = newNode(hash, key, value, null ); else { Node<K,V> e; K k; if (p.hash == hash && ((k = p.key) == key || (key != null && key.equals(k)))) e = p; else if (p instanceof TreeNode) e = ((TreeNode<K,V>)p).putTreeVal(this , tab, hash, key, value); else { for (int binCount = 0 ; ; ++binCount) { if ((e = p.next) == null ) { p.next = newNode(hash, key, value, null ); if (binCount >= TREEIFY_THRESHOLD - 1 ) treeifyBin(tab, hash); break ; } if (e.hash == hash && ((k = e.key) == key || (key != null && key.equals(k)))) break ; p = e; } } if (e != null ) { V oldValue = e.value; if (!onlyIfAbsent || oldValue == null ) e.value = value; afterNodeAccess(e); return oldValue; } } ++modCount; if (++size > threshold) resize(); afterNodeInsertion(evict); return null ; }
其中判断是否扩容的条件是用resize方法实现的,其中涉及到了一个扩容因子为0.75,当达到这个容量的时候就会去进行一个容的扩(*2)。
1 2 3 4 else { newCap = DEFAULT_INITIAL_CAPACITY; newThr = (int )(DEFAULT_LOAD_FACTOR * DEFAULT_INITIAL_CAPACITY); }
HashSet实践 放入自定义类,并判断当属性和Set中的某一个元素相同的时候,添加失败,返回false
以下是我第一次碰见这道题目的解决方式(有些复杂)
由于这里不同创建的对象有着相同的属性,而set.add中所判断的是HashCode从而判断这是两个不同的元素,我们需要重新创建添加方法
我在这里建立了三个方法,其中的类方法是重写了equals方法使其判断两个员工类的属性是一致的,而在两个静态方法中,addSet调用了contains方法去判断在set中是否有和待添加的元素属性相同的元素,有则不添加
1 2 3 4 5 6 7 8 9 10 11 12 13 14 15 16 17 18 19 20 21 22 23 24 25 26 27 28 29 30 31 32 33 34 35 36 37 38 39 40 41 42 43 44 45 46 47 48 49 50 51 52 53 54 public class HomeWork { public static void main (String[] args) { Set set = new HashSet (); Employee person1 = new Employee ("黎明" , 18 ); Employee person2 = new Employee ("丽丽" , 11 ); Employee person3 = new Employee ("黎明" , 18 ); addSet(person1, set); addSet(person2, set); addSet(person3, set); System.out.println(set.size()); } public static boolean addSet (Object o, Set set) { if (contains(o, set)) { return false ; } set.add(o); return true ; } public static boolean contains (Object o, Set set) { Employee person = (Employee) o; Iterator it = set.iterator(); while (it.hasNext()) { Employee temp = (Employee) it.next(); if (person.equals(temp)) { return true ; } } return false ; } } class Employee { String name; int age; public Employee (String name, int age) { this .name = name; this .age = age; } @Override public boolean equals (Object o) { if (o instanceof Employee) { Employee temp = (Employee) o; if (temp.name == this .name && temp.age == this .age) { return true ; } } return false ; } }
而标准的方式则是去重写hashCode的一个方法,在hashCode中去调用一个Objects的方法hash(name, age),传入name和age,当数据相等的时候,返回的哈希值就是一样的
1 2 3 4 5 6 7 8 9 10 11 12 13 14 15 16 17 18 19 20 21 22 23 24 25 26 27 28 29 30 31 32 33 34 35 36 37 38 39 40 41 42 43 import java.util.HashSet;import java.util.Objects;import java.util.Set;public class HomeWork { public static void main (String[] args) { Set set = new HashSet (); Employee person1 = new Employee ("黎明" , 18 ); Employee person2 = new Employee ("丽丽" , 11 ); Employee person3 = new Employee ("黎明" , 18 ); set.add(person1); set.add(person2); set.add(person3); System.out.println(set.size()); } } class Employee { String name; int age; public Employee (String name, int age) { this .name = name; this .age = age; } @Override public boolean equals (Object o) { if (o instanceof Employee) { Employee temp = (Employee) o; if (temp.name == this .name && temp.age == this .age) { return true ; } } return false ; } @Override public int hashCode () { return Objects.hash(name, age); } }
基于 Arrays.hashCode(Object[]),遍历字段并合并哈希,必须保证 equals() 相同的对象,Objects.hash() 结果相同
LinkedHashSet 1 2 3 public class LinkedHashSet <E> extends HashSet <E> implements Set <E>, Cloneable, java.io.Serializable {
1.是HashSet的子类,同时也实现了Set接口
2.LinkedHashSet底层是一个LinkedHashMap,底层维护了一个数组+双向链表
3.LinkedHashSet根据元素的hashCode值来决定元素的存储位置,同时用链表维护元素的次序,使得元素在看起来是以插入顺序保存的
4.LinkedHashSet不允许添加重复元素
其中存储的节点继承于HashMapNode,名为Entry是一个内部类
1 2 3 4 5 6 static class Entry <K,V> extends HashMap .Node<K,V> { Entry<K,V> before, after; Entry(int hash, K key, V value, Node<K,V> next) { super (hash, key, value, next); } }
其中维护了先后引用用于,达到顺序输出的效果
TreeSet 通过传入一个Comparator接口可以实现有序的排序(可自定义)
注意这里如果不传入Comparator就会将添加入的对象转为Comparable类型,如果这个类型没有实现Comparable接口的话就会发生异常,抛出错误ClassCastExceprion
1 2 3 4 5 6 7 8 9 10 11 12 13 14 15 16 17 public class TreeSet01 { @SuppressWarnings({"all"}) public static void main (String[] args) { TreeSet treeSet = new TreeSet (new Comparator () { public int compare (Object o1, Object o2) { String s1 = (String)o1; String s2 = (String)o2; return s1.compareTo(s2); } }); treeSet.add("jack" ); treeSet.add("ae" ); treeSet.add("jille" ); treeSet.add("band" ); System.out.println(treeSet); } }